Thermal optics are only as useful as the targets you can see. If you have a scope that picks up heat but no solid thermal target, your zero work and practice can get frustrating fast.
The IR.Tools heater and paster kit gives you a simple way to build your own thermal targets with clear aim points. In this walkthrough, you will see how the attachable heater and the 25 meter and 50 meter pasters work together to create a clean, high contrast thermal picture that is easy to pick up, even indoors or on a cloudy day.
Below is the original video demo that this guide follows, so you can watch the full process in real time:
Unpack and Prep the Attachable Heater
The setup starts with a single piece: the attachable chemical heater. It comes sealed in its own bag so it is ready whenever you need it.
Once the bag is opened, the heater is pulled out and given a quick shake. That motion wakes up the chemical pack inside and starts the heating process. You do not need tools or power, just a firm shake and a little time.
Stick the Heater on Your Target
After the heater has had that first shake and begins to warm up, the next step is to attach it to the target.
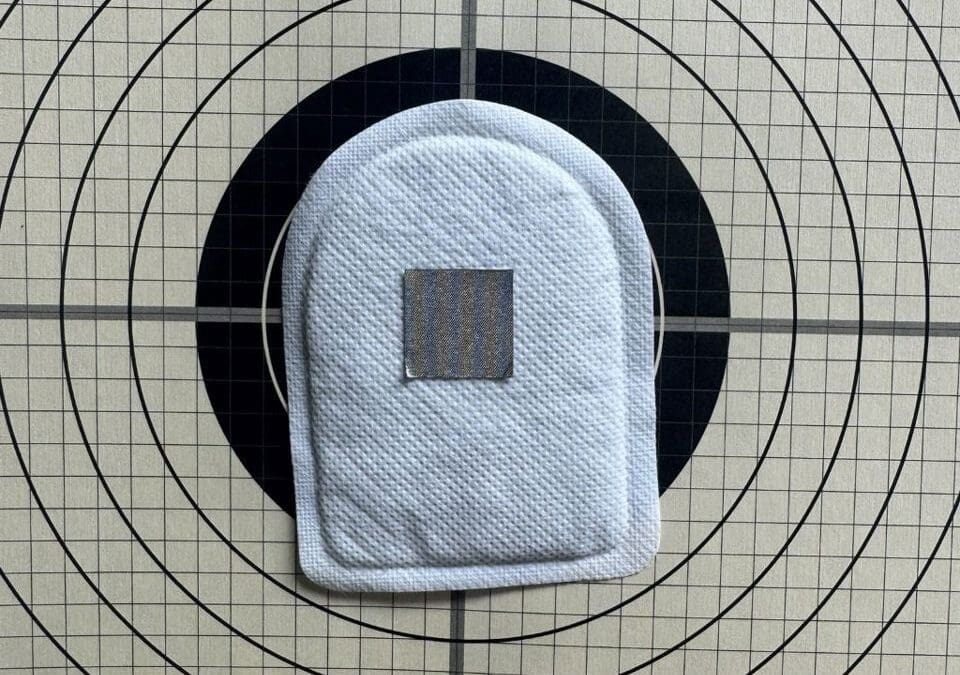
On the back of the heater is an adhesive surface. The backing is peeled away so the sticky side is exposed. In the video, the heater is then placed right on the center of the target.
Once the adhesive is exposed, placement is simple:
- Center the heater on the target face for the best reference point.
- Press it down firmly so it makes good contact and will not peel off.
As soon as it is in place, the heater keeps heating up. That growing warm spot on the paper or cardboard becomes the thermal foundation. By itself, it would show as a bright area through a thermal optic. The real magic comes when you pair it with a thermal paster.
This step creates a warm background layer, which the paster will shape into a clear, crisp aim point.
Add the 25 Meter Paster for a Sharp Aim Point
With the heater mounted and warming the center of the target, the next part of the kit comes into play: the 25 meter paster.
Placement Over the Heater
From the IR.Tools kit, a 25 meter paster is pulled out. This is a small, cold patch sized for a 25 meter zero reference. In the demo, it is placed right at the center of the target, on top of the heater.
The process is very straightforward:
- The paster is peeled from its backing.
- It is aligned with the middle of the target.
- It is pressed directly on top of the heater.
At this point, you now have a warm heater patch stuck to the target, with a 25 meter paster sitting squarely over the center of that heat. To the eye, it just looks like a patch over a sticker, but through thermal optics, the effect is very different.
What You See in Thermal View
Once the heater fully warms, the combination of heater and paster creates a very clear pattern in thermal view.
As described in the demo, you see a cold spot directly in the middle where the 25 meter paster sits, and a nice warm spot all around it where the heater is exposed. The paster blocks the heat from the heater, so that portion appears darker or colder compared to the bright ring around it.
You end up with:
- Cold center: a defined, dark aim point where the paster covers the heater.
- Warm edges: a bright halo of heat around that center, created by the exposed heater.
That contrast gives you a nice sharp aim point with plenty of heat for your optic to pick up. Even if conditions are poor, the pattern stands out. The demo notes that this setup could be used to zero inside, or to keep a clear target picture on a horribly cloudy day when natural thermal contrast is weak.
Instead of hunting for a faint target, you get a bold center point surrounded by obvious heat, which makes it easier to refine your zero at 25 meters.
Switch to the 50 Meter Paster to Compare
After showing how the 25 meter paster looks over the heater, the demo moves to the larger size: the 50 meter paster. This shows how the same heater can support different aiming references.
Thermal View Results
Once the 50 meter paster is in place and the heater continues to do its job, the thermal picture shifts slightly.
You still have the key pattern: a cooler center over a warm patch. The 50 meter paster is larger, so it covers more of the heater and alters the balance between the cold and warm areas. You get a bigger dark center with a surrounding and center field of heat.
In simple terms, you are seeing the same neat heat setup, just scaled for 50 meters. The target still presents:
- A clear center that stands out as a warm spot.
- A doughnut that stands out as a cool ring
- A solid field of heat around that center, which your thermal optic can pick up quickly.
The larger paster size is matched to a different shooting distance, but the core idea does not change. The heater provides reliable warmth, and the paster shapes that warmth into a clean, easy to see aim reference.
This quick swap shows how one heater on a single target can support more than one distance reference, just by changing the paster.
DIY Thermal Targets with the IR.Tools Heater and Paster Kit
By the end of the demo, you see a complete picture of what this kit is built to do. With only a few simple parts and no power cables, you can build a thermal target that your optic can pick up in almost any lighting.
The concept behind the kit is simple and time tested. As the description explains, Chemical heaters and thermal pasters have long been used for making thermal targets. IR.TOOLs makes it convenient with heaters individually packaged with a variety of precut pasters. The video you just saw is a direct example of that idea in action.
Here is what stands out about this setup:
- Heaters are individually packaged, so you open and use them one at a time.
- You get a variety of precut pasters, including 25 meter and 50 meter sizes.
- The kit makes it easy to build do it yourself targets or a zero target that matches your needs.
This type of kit fits several common use cases:
- Practice zero work indoors where you still need a solid thermal reference.
- Train on cloudy days when there is less natural contrast for thermal optics.
- Put together quick custom thermal setups on basic paper or cardboard targets.
Conclusion
Thermal optics shine when they have something clear to lock onto. The IR.Tools heater and paster kit gives you that clear aim point without a complex range setup or special hardware.
By pairing a small chemical heater with matched 25 meter and 50 meter pasters, you get a cold center and warm surround that pops through a thermal sight. The setup in the demo shows how fast you can go from a plain target face to a sharp thermal reference that works inside or on a cloudy day.
If you use thermal gear and want a straightforward way to build your own thermal targets, this style of heater and paster kit is worth a close look. Watch the video, study how the cold center and warm halo appear, and think about how a similar layout could support your own zero work and practice sessions.
